ETCD线上问题修复,节点重建

生产的ETCD节点一直报错【pkg/fileutil: failed to lock file, path: /bitnami/etcd/data/member/wal/0000000000000000-0000000000000000.wal, error: fileutil: file already locked】

怀疑是版本问题、同步升级了版本没有解决,准备重建一个ETCD节点。

1、机器是基于docker创建的etcd,先创建备份数据。

etcdctl snapshot save 20250107.db

etcdctl snapshot status 20250107.db

2、停止ETCD服务,并重建数据文件夹。

要使用root用户进行重建,然后再修改重建数据的权限。

docker run --user root --entrypoint='' -it -v /data/etcd/data:/bitnami/etcd docker.io/bitnami/etcd:3.4.33  bash

[Run In Container]>>> etcdctl snapshot restore 20250107.db --data-dir /bitnami/etcd/data/
chown -R  1001 data 

3、重新启动服务,等待加载数据。

docker-compose up -d

这里加载数据要慢一些,别担心。

再观察日志修好问题了,年更一下博客、迎接2025。

docker 20.10.x 稳定版本安装

较旧的 Docker 版本称为 docker 或 docker-engine 。如果已安装这些程序,请卸载它们以及相关的依赖项。\

yum remove docker \
docker-client \
docker-client-latest \
docker-common \
docker-latest \
docker-latest-logrotate \
docker-logrotate \
docker-engine


yum install -y yum-utils device-mapper-persistent-data lvm2
yum-config-manager --add-repo http://mirrors.aliyun.com/docker-ce/linux/centos/docker-ce.repo
yum clean all
yum makecache

yum install docker-ce-20.10.24  docker-ce-cli-20.10.24 docker-ce-rootless-extras-20.10.24

最近Docker镜像封的比较厉害,必须用源的方式进行安装、大家可以自己行解决源问题。

DinD 的情况文件丢失的问题

Docker in Docker 的情况下,里面 Dockerr看不到上层的文件 ,在里层 Docker 启动的时候挂载目录需要填宿主机的目录才可以。

比如,在对于 Jenkins 里面的 Docker In Docker

【错误】docker run -i -v /srv:/srv maven:3.8.6-openjdk-8 find /srv

【正确】docker run -i -v /data/kairui/jenkins/data/workspace/code/scan/:/srv maven:3.8.6-openjdk-8 find /srv

解决方法来自于 https://stackoverflow.com/questions/71777919/docker-inside-docker-file-missing

Drone 迁移遇到docker打包无权限的问题

之前Drone在云服务器上、服务器快要到期了需要迁移到线下。迁移过程中Docker打包过程遇到了报错。

latest: Pulling from plugins/docker
Digest: sha256:fb41cf8f7df1ff4e62c74e10bf38d9a25a1d28298e6719386a641b1507c935a2
Status: Image is up to date for plugins/docker:latest
+ /usr/local/bin/dockerd --data-root /var/lib/docker --host=unix:///var/run/docker.sock
Unable to reach Docker Daemon after 15 attempts.
Registry credentials or Docker config not provided. Guest mode enabled.
+ /usr/local/bin/docker version
Client:
 Version:           20.10.14
 API version:       1.41
 Go version:        go1.16.15
 Git commit:        a224086
 Built:             Thu Mar 24 01:45:09 2022
 OS/Arch:           linux/amd64
 Context:           default
 Experimental:      true
Cannot connect to the Docker daemon at unix:///var/run/docker.sock. Is the docker daemon running?
exit status 1

问题猜测、宿主机Docker版本不一致导致。

执行 rpm -qa|grep docker,之后发现新服务器是docker23、旧云上服务器为docker20。

先将docker进行卸载,再执行 yum install docker-ce-20.10.5 docker-ce-cli-20.10.5 docker-ce-rootless-extras-20.10.6。

降级完后、发现问题还是没有解决。

问题处理、开启Docker构建的Debug日志。

  - name: docker
    depends_on: [maven,node]
    image: plugins/docker
    privileged: true
    settings:
      username:
        from_secret: docker_username
      password:
        from_secret: docker_password
      registry: registry.qq.com
      repo: registry.qq.com/aa/bb
      debug: true

发现这个环节出现了问题。

failed to start daemon: Error initializing network controller: error obtaining controller instance: failed to create NAT chain DOCKER: iptables failed: iptables -t nat -N DOCKER: modprobe: can't change directory to '/lib/modules': No such file or directory

但是将问题的命令[iptables -t nat -N]放到宿主机执行发现没有问题,猜测是容器环境下调用这个命令有问题。先验证一下自己的猜想。

docker run --entrypoint='' -v /var/run/docker.sock:/var/run/docker.sock -it plugins/docker sh

通过以上命令分别的新/旧服务器开启一个拟真的构建环境。再次在容器内部执行[iptables -t nat -N],发现新服务器确认有异常。

才发现新服务器为centos8.5、旧服务器为centos8.2,docker容器一致的apline3.15。找到问题根源了。

查询到资料https://www.cnblogs.com/redcat8850/p/16135814.html

最终通过在新宿主机上执行以下命令解决。

modprobe iptable_nat

modprobe iptable_filter

Kafka配置内外网访问

kafka配置KAFKA_LISTENERS和KAFKA_ADVERTISED_LISTENERS

介绍kafka的两个参数KAFKA_LISTENERS和KAFKA_ADVERTISED_LISTENERS

主要在kafka需要部署在container里面时必须要注意用到。

1.kafka安装在原生主机上

配置KAFKA_LISTENERS=PLAINTEXT://:9092

因为这种场景下主机都是明确的,对谁都一样;任何人都可以通过<hostname>:9092访问kafka。

2.kafka安装在container里面

因为container里面的主机和端口,只有和container在同一个网络里的主机才能访问,而默认情况下container所在的宿主机是访问不了的。

例如:KAFKA_LISTENERS=PLAINTEXT://:9092, 那么:

  1. 在container内部,访问 localhost:9092
  2. 在和container同一个网络的其他container内部:访问<containerhost>:9092
  3. 在container宿主机上,不能访问:localhost:9092,也不能访问:<containerhost>:9092; 因为他们不通。

那么如何在宿主机上访问呢?
首先想到要把端口映射出来:9092:9092,把kafka container的端口9092映射到主机上的9092;

再试一下宿主机上:localhost:9092,这时是可以成功的。
换一个用法:<hostname>:9092,既然都映射出来的,我不用localhost而用真正的主机名行不行呢,答案是不行的,是不是很吃惊。这就引发另一个问题,和宿主机在同一个网络的其他物理主机也不能访问kafka了,因为不能通过hostname:9092的地址访问啊。

原因是什么呢?
这里我们就要提到KAFKA_ADVERTISED_LISTENERS的使用。
其实kafka客户端访问kafka是分两步走:

  1. 第一步,不管什么方式,客户端只要能连接到KAFKA_LISTENERS标识的地址,成功完成必要的认证后,就可以得到一个brokers返回地址。
  2. 第二步,通过返回的brokers重新建立和kafka的连接,生成producer/consumer。这个返回的brokers就是KAFKA_ADVERTISED_LISTENERS的值。

kafka对这两个参数的说明:

  • KAFKA_LISTENERS=PLAINTEXT://<addr>:<port>
    定义kafka的服务监听地址,addr可以为空,或者0.0.0.0,表示kafka服务会监听在指定地址。
  • KAFKA_ADVERTISED_LISTENERS
    kafka发布到zookeeper供客户端使用的服务地址,格式也是PLAINTEXT://<addr>:<port>,但是addr不能为空。
    如果KAFKA_ADVERTISED_LISTENERS没有定义,则是取的KAFKA_LISTENERS的值。
    如果KAFKA_LISTENERS的addr没有定义,则取的java.net.InetAddress.getCanonicalHostName()值。

结合我们的例子:

  1. 容器内定义了:KAFKA_LISTENERS=PLAINTEXT://:9092
    标识kafka服务运行在容器内的9092端口,因为没有指定host,所以是0.0.0.0标识所有的网络接口。
  2. 没有定义KAFKA_ADVERTISED_LISTENERS
    按缺省规则,等同于KAFKA_LISTENERS,即PLAINTEXT://:9092,但由于host不能为空,于是取java.net.InetAddress.getCanonicalHostName(),正好取到localhost。
  3. 于是在容器内和宿主机上都能通过地址localhost:9092访问kafka;但其实他们有本质的区别。
    在宿主机上通过localhost:9092第一次访问kafka,这个localhost是宿主机,9092是映射到宿主机的端口,容器内的kafka服务接到访问请求后,把KAFKA_ADVERTISED_LISTENERS返回给客户端,其本意是我容器主机localhost和容器端口9092,而客户端接到这个返回brokers后重新解析了localhost为宿主机,和宿主机的端口;但他们正好能够合作。

3.发布主机名服务

如何让外部其他主机也能访问。
方案已经很明确了,就是发布一个KAFKA_ADVERTISED_LISTENERS到所有人都认识的地址。

  1. 修改docker配置,让container能够访问宿主主机。
  2. 映射kafka容器端口9092到宿主主机。
  3. 定义KAFKA_ADVERTISED_LISTENERS=PLAINTEXT://<宿主主机>:9092

这样不管是谁都通过统一的<宿主主机>:9092地址来访问kafka。

4.发布内外分开的地址

让容器网络上的主机访问一个kafka地址,让宿主机网络上的主机访问另一个kafka地址,实现内外地址分离。

  1. 定义kafka配置

export KAFKA_LISTENERS=INSIDE://:9092,OUTSIDE://:9094
export KAFKA_ADVERTISED_LISTENERS=INSIDE://<container>:9092,OUTSIDE://<host>:9094
export KAFKA_LISTENER_SECURITY_PROTOCOL_MAP=INSIDE:PLAINTEXT,OUTSIDE:PLAINTEXT
export KAFKA_INTER_BROKER_LISTENER_NAME=INSIDE

主要INSIDE和OUTSIDE不是保留字,只是普通标识,可以任意取名,解释在KAFKA_LISTENER_SECURITY_PROTOCOL_MAP。

  1. 映射容器端口9094到主机9094
  2. 结果是
    在容器内kafka服务监听在两个端口9092和9094,端口9094被映射到外面同端口,9094:9094。
    容器网络使用<container>:9092访问kafka,主机网络使用<host>:9094访问kafka。
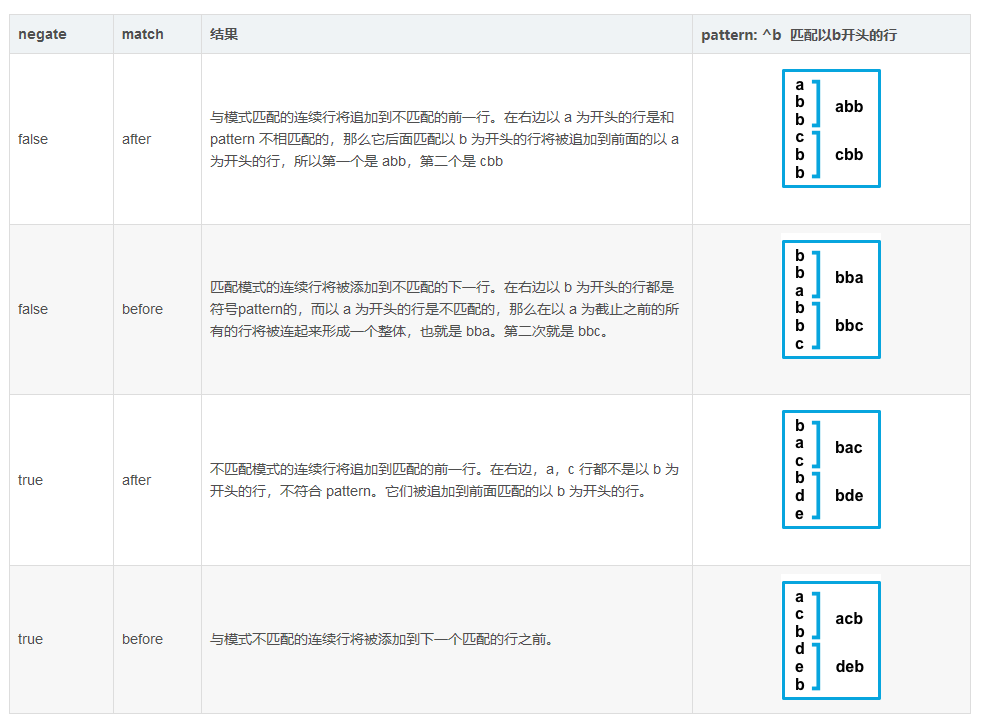
Filebeat multiline模式

multiline.pattern

指定要匹配的正则表达式模式。 请注意,Filebeat支持的正则表达式模式与Logstash支持的模式有些不同。 有关受支持的正则表达式模式的列表,请参见正则表达式支持。 根据你配置其他多行选项的方式,与指定正则表达式匹配的行将被视为上一行的延续或新多行事件的开始。 你可以设置 negate 选项以否定模式。

multiline.negate

定义是否为否定模式,也就是和上面定义的模式相反。 默认为false。

multiline.match

指定Filebeat如何将匹配的行组合到事件中。 设置在之后 (after) 或之前 (before)。 这些设置的行为取决于你为否定指定的内容:

processors:
  - script:
      when:
        has_fields: [ 'log.file.path' ]
      lang: javascript
      id: add_env_info
      source: >
        function process(event) {
            var logPath=event.Get("log.file.path");
            event.Put("fileset.env", /\/data\/kairui-(\w+)\/\w+/.exec(logPath)[1]);
            event.Put("fileset.project", /\/data\/kairui-\w+\/(\w+)/.exec(logPath)[1]);
            if(/project[a-z-]*\.log$/.test(logPath)){
               var msgInfo = /([\d-]+\s[\d:]+[\.\d]*)\s+([A-Z]+)/.exec(event.Get("message"));
               if(msgInfo.length>2){
                  event.Put("log_time", msgInfo[1]);
                  event.Put("fileset.level", msgInfo[2]);
               }
            }
        }
  - timestamp:
        field: log_time
        timezone: Asia/Shanghai
        layouts:
          - '2006-01-02 15:04:05'
          - '2006-01-02 15:04:05.999'
          - '02/Jan/2006:15:04:05 +0800'
        test:
          - '2020-08-05 16:21:51.824'
          - '26/Jan/2022:15:06:12 +0800'

最后通过官网指导链接、将filebeat内置的dashboard导入到Kibana里面 https://www.elastic.co/guide/en/beats/filebeat/current/load-kibana-dashboards.html

Spring boot 引入shardingsphere

第一步、引入扩展pom.xml

<dependency>
            <groupId>org.apache.shardingsphere</groupId>
            <artifactId>shardingsphere-jdbc-core-spring-boot-starter</artifactId>
            <version>5.1.1</version>
</dependency>

第二步、配置规则

  shardingsphere:
    mode:
      type: Memory
    props:
      sql:
        show: true
    datasource:
      names: ims0
      ims0:
        type: com.zaxxer.hikari.HikariDataSource
        driver-class-name: com.mysql.jdbc.Driver
        url: ${spring.datasource.url}
        username: ${spring.datasource.username}
        password: ${spring.datasource.password}
    rules:
      sharding:
        tables:
          ims_message:
            actual-data-nodes: ims0.lego_ims_message$->{0..1}
            table-strategy:
              standard:
                sharding-column: message_id
                sharding-algorithm-name: sess_id_mod
        sharding-algorithms:
          sess_id_mod:
              type: MOD
              props:
                sharding-count: 2

第三步、自行生成实体类,唯一区别将实体类的@TableName(value =”ims_message”) 改成逻辑表名,其他所有都不变。

package com.kairuidata.ims.entity;

import com.baomidou.mybatisplus.annotation.IdType;
import com.baomidou.mybatisplus.annotation.TableField;
import com.baomidou.mybatisplus.annotation.TableId;
import com.baomidou.mybatisplus.annotation.TableName;
import java.io.Serializable;
import java.util.Date;
import lombok.Data;

/**
 * 消息表
 * @TableName lego_ims_message
 */
@TableName(value ="ims_message")
@Data
public class ImsMessage implements Serializable {
    /**
     * 主键id
     */
    @TableId(value = "message_id")
    private Long messageId;

    /**
     * 会话id
     */
    @TableField(value = "sess_id")
    private Integer sessId;

    /**
     * 会话状态 1私聊 2群聊
     */
    @TableField(value = "type")
    private Integer type;

    /**
     * 删除状态 1合法
     */
    @TableField(value = "status")
    private Integer status;

    /**
     * 消息文本
     */
    @TableField(value = "msg")
    private String msg;

    /**
     * 消息文本
     */
    @TableField(value = "extra")
    private String extra;

    /**
     * 创建时间
     */
    @TableField(value = "create_date")
    private Date createDate;

    /**
     * 修改时间
     */
    @TableField(value = "update_date")
    private Date updateDate;

    @TableField(exist = false)
    private static final long serialVersionUID = 1L;
}

FlinkSql处理时间转换

使用UDF方式

     tEnv.createTemporarySystemFunction("datestr", DateStr.class);
     public static class DateStr extends ScalarFunction{
        public String eval(@DataTypeHint(inputGroup = InputGroup.ANY) Object d){
            return new SimpleDateFormat("yyyy-MM-dd HH:mm:ss.SSS").format(d);
        }
     }
        tEnv.executeSql("insert into t_parking_log (select id,parkingId,parkingType,carCode,TO_TIMESTAMP(datestr(createdTime)) as ctime from t_cnt_parking_log)");

Flink Kafka连接器报错解决

Caused by: org.apache.flink.table.api.ValidationException: Cannot discover a connector using option: 'connector'='kafka'
	at org.apache.flink.table.factories.FactoryUtil.enrichNoMatchingConnectorError(FactoryUtil.java:587)
	at org.apache.flink.table.factories.FactoryUtil.getDynamicTableFactory(FactoryUtil.java:561)
	at org.apache.flink.table.factories.FactoryUtil.createTableSink(FactoryUtil.java:180)
	... 32 more
Caused by: org.apache.flink.table.api.ValidationException: Could not find any factory for identifier 'kafka' that implements 'org.apache.flink.table.factories.DynamicTableFactory' in the classpath.

在单机跑通集群环境下失败,去https://nightlies.apache.org/flink/flink-docs-release-1.14/zh/docs/connectors/table/kafka/ 下载依赖,放到服务器lib目录即可。

验证是否添加成功,将连接器填错查看报错是否有Kafka连接器。

Caused by: org.apache.flink.table.api.ValidationException: Could not find any factory for identifier 'kafkaa' that implements 'org.apache.flink.table.factories.DynamicTableFactory' in the classpath.

Available factory identifiers are:

blackhole
datagen
filesystem
jdbc
kafka
print
upsert-kafka
	at org.apache.flink.table.factories.FactoryUtil.discoverFactory(FactoryUtil.java:399)
	at org.apache.flink.table.factories.FactoryUtil.enrichNoMatchingConnectorError(FactoryUtil.java:583)
	... 33 more